Sketch2code using Visual Attention & LSTM Decoder

- Introduction
- Background and Related Work
- Getting the dataset
- Model architecture
- Training
- Attention Visualization
- Result Visualization
- Final thought
- Citation
- Appendix
Introduction
This blog post is a tutorial how to use machine learning to generate HTML codes from layuot images. Specifically, we are interested in how to create a neural network model that interpret a hand sketch of a simple web page design and generate a corresponding HTML code. In real world, this is quite a complicated task, so in this work we will just focus on turning a simple wireframe sketch into a HTML layout. The model framework that we will use is attention-based image captioning . The simple justification for using this architecture is that instead of generating a natural language, the model task is to generate a computer code that is a “caption” of an image.
Background and Related Work
Implementing a mock up design is a tedious, time-consuming process, and can create a bottleneck in a design development project. A considerable amount of time is spent on just creating a boiler plate HTML codes. Therefore, there is an active area of research on how to use machine learning to assist in this process. Notably, pix2code by Tony Beltramelli combines both computer vision method and NLP method to translate image to codes for mobile app interfaces and web pages.
In a broader context NLP has seen tremendous progress in recent year thanks to the advent of attention mechanism and transformer architecture. I’m now seeing interdisciplinary bridging of NLP and other areas of artificial intelligence/mechine learning, such as computer vision or deep learning for speech/audios. This kind of work called Multimodal Machine Learning aims at analyzing multiple information modalities. Image captioning is one good example here.
Getting the dataset
searching for the right data
When I started thinking about what project to work on, first I think it has to be something about multimodal machine learning, and the sketch2code comes to mind. Then I searched for what dataset is available. Ideally, I’d want to have a lot of paired image/code samples. It is surprisingly quite difficult to find ones. Nevertheless, thanks the generosity of the pix2code author, I was able to find on the internet the open-source dataset he used for his work. The dataset I have consists of 1700 sketch-like images and their correspondingly codes.
First, let’s talk about the images. The images are engineered from turning the HTML to website interface. Then the CSS stylesheets is modified to change the border radius of HTML elements, and change the font and color of the elements. This is to make the sharp-looking website interface into a fuzzy-looking human sketch.

Figure 1. creating the sketch sample from webpage image
Second, the computer codes are written in a domain-specific language (DSL) that the dataset author created for this task specifically. The file is in the “.gui” format. This is really nice because it is more concise. This makes the training easier, and the result more interpretable. The downside is that we will need a complier to translate the “.gui” DSL to HTML code. I was able to find the complier he used. So this step worked out well.
tokenization
After I get the dataset, I have to turn the DSL code into numeric tokens. This is exactly the same as tokenization in NLP except we doesn’t work with English or French, but a computer language. In a way, this should make the task much easier since the lexicon of computer languages is much much smaller than the lexicon of human languages. There are only 17 unique “words” in the corpus. In fact, during the process, I found that the syntax of this DSL code is also much more regular than human languages. There are only 11 unique “lines” in the corpus. This makes me think that it’s a lot easier to tokenize the whole line than to do at the word level. The reasons are two-folds: first is that a smaller vocab size makes the embedding easier, and second is that a shorter sequence length eliminates the long-range dependency problem that often occurs in recurrent neural network. So in the end I tokenize the lines. There are 11 tokens plus 3 special tokens for “start”, “end”, and “padding”. The maximum sequence length is 47.
Model architecture
Previous works by Tony Beltramelli and Ashwin Kumar have been using image captioning styled model using CNN encoder LSTM decoder. My attempt here is built on this work, but will incorportate an attention mechanism to it. Adding attention improves 2 things
-
it provides more relevant context to the LSTM decoder. Previous work extract a static encoded representationn from image input before feeding it to the decoder. LSTM is doing the work both keeping track of the context and generate the output as it goes. With the attention mechanism, the context is the attention-weighted encoded representation. This part is no longer learned upon training, as the attention layer learns to map input to output.
-
it adds the interpretable layer into the work. So we can plot and see which part of the input that the model is up-weighted (i.e. relevant context to the output) and which part is down-weighted (i.e. not relevant).
This architecture is not new, and has been used extensively in natural image maptioning task. What I’m doing here is to leverage it for sketch2code task.

Figure 2. model architecture
Training
Training strategy
I split 1500 images for training and the rest 200 images for validation. Pre-trained Resnet-101 is used as an encoder. I throw away the final fully connected layer. So our encoded representation is the final convolution output. The LSTM cell is used as a decoder. The token embedding layer has embedding dimension = 256. The hidden dimension of the LSTM is also 256 dimension.
Because of the nature of recurrent neural network, the current generated output is fed back to the model to generate subsequent output. This means if the current generated output is erroneous, subsequent output will be conditional to wrong input. This makes the training harder to converge and prone to instability.
To make the training more robust, I implemented teacher forcing trategy. This means instead of using the current generated output, the actual output (i.e. the ground truth) is used to generate the next output. This means if a mistake is made during the training, it won’t propagate through time. One drawback is that the accuracy metric is not going to reflect the actual generation step when the ground truth isn’t provided.
As for the validation, since teacher forcing is no longer used at this step. I generate the candiate outputs using beam-search algorithm. The idea is that at each time step of the sequence generation, candidate outputs are ranked by the overall scores (i.e. the softmax probability of the token). After the sequence generation is completed, the overall highest score is chosen as the winner. This algorithm is used to reduce the risk of missing high probability token that comes after a low probability one.
Execution
The training was performed on 1 Tesla P-100 GPU. Each epoch took about 3 minutes, so that’s not so bad. I try training it for 10 epochs and measure the accuracy on the validation set after each training epoch (i.e. accuracy score of the generated token and the grounth truth). The token generation uses beam search algorithm with beam width = 3 . The best accuracy I got is about 90%. However, this is not very consistent across trial. Sometimes I got accuracy as low as 30% and has to train further til 50 epochs. This perhaps has to do with initialization.
Attention Visualization
Here I pair the attention weights representing the input context to the output token (shown as text above). There are a few things to note here. First is that the attention moves from top of the page to bottom of the page, as the code describes from the top to the bottom of website page. Second is that the attention for the token “row” often focuses on the space inside the wireframe box, where as the the token “” focuses on the perimeter around the box.

Figure 3. Visualizing the attention
I include a few more of these examples in the appendix.
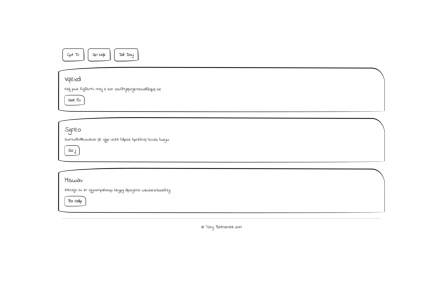
Result Visualization
I then compile the DSL code to HTML. Here are some of the results.
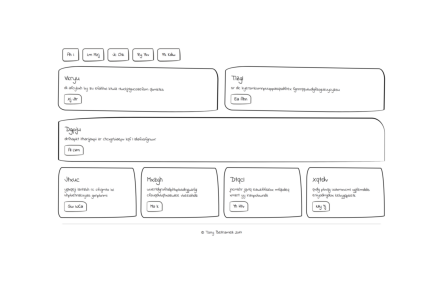

Not all are successful. Here is one where it got wrong in an interesting way, namely instead of making 3 box layout. It makes 4 layout.

Finally, it’s time for a real trial. I sketched a wireframe layout on a sheet of paper, and took photo of the paper and send the photo through the model. Here is the HTML it made.


Final thought
It’s a good start that it’s working, at least for simple layouts. The hope is that we can perhaps scale up to a more complex layouts, such as one with figure or link defined in the layout. This would definitely involve a lot more coding to make sure that it compile correctly, and a lot of machine learning hacking to incorporate text extraction to the captioning.
Another thing to try in the future is to adapt a transformer model which has been so enormously successful in NLP to perform sketch2code task. This may require bigger data than I have now, but it could also better scale to a more complex layout.
Citation
My Github here is my Github repo on this work.
pix2code This work really influences a lot of subsequent work on the user interface to code by neural network. I use the data, and the compiler from this github.
Show, Attend and Tell This paper provides the model framework to my work.
Ashwin Kumar blogpost This blog post really summarizes the pipeline from creating the data, pre-processing and training the neural network model.
sgrvinod pytorch tutorial-to-image-captioning AaronCCWong Show-Attend-and-tell These two githubs implement the attention-based image captioning network architecture in pytorch. A Big part of the model codes are adapted from these 2 works.
Appendix

Figure supplement 1. Visualizing the attention

Figure supplement 2. Visualizing the attention

Figure supplement 3. Visualizing the attention